We often get asked how to ventilate a roof space at an open eaves, so we’ve come up with this guide to help answer the most commonly asked questions.
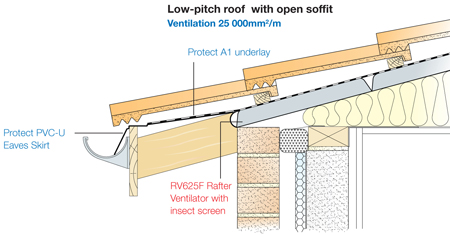
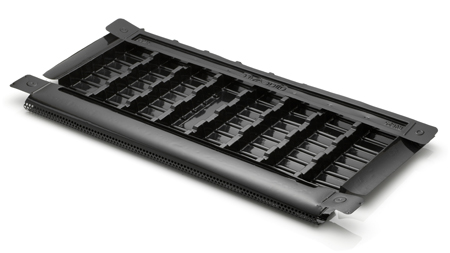
When ventilating an open eaves detail we recommend using Glidevale’s RV Rafter Ventilators supplied with an integral 4mm insect screen. This simple, cost-effective and easy to install solution can provide a ventilation opening of 10,000mm²/m or 25,000mm²/m as required by BS 5250 Control of Condensation in Buildings.
FAQs
Q. What type of rafter ventilators are available to vent an open eaves?
A. This depends on what amount of ventilation you require. Our RV625F supplies 25,000mm²/m whereas our RV601F gives 10,000mm²/m. Our friendly technical advisors can advise the ideal product for your needs.
Q. Are they easy to cut down if they are too wide for the rafters?
A. Yes, they are made from PVC and can easily be cut with a pair of scissors or Stanley knife.
Q. Where can I purchase Glidevale rafter ventilators?
A. Either order from your local builders’ merchant or online on the BPD Store.
Q. Why do I need a fly screen type?
A. With the ventilator being fitted to an open eaves the fly screen will prevent nesting insects entering the airspace within the loft.
Q. How easy are the ventilators to fit?
A. The fitting of rafter ventilators is very simple. However, when retrofitting them, there is an element of roofing and brick pointing in order to refit the bottom rows of tiles or slates. For more information, see our handy guide below. Always refer to the supplied fixing instructions when fitting.
Q. Will they fit my roof?
A. They are available in 400mm, 450mm and 600mm widths and can easily be cut where needed to suit differing rafter centres.
Q. How deep are they and will they be deep enough?
A. They are 350mm deep (up the rafter). If a deeper run is needed to ensure air movement past loft insulation, simply place another rafter vent further up the rafter. Any subsequent vents would not need a fly screen.
Q. Do I fit them flush with the brickwork on an open eaves?
A. The rafter vents should protrude past the wall 25mm to ensure the optimum air flow rate.

Guide to fitting Glidevale rafter ventilators
To ensure a safe working environment, scaffolding will most likely be required prior to starting works as, for the majority of cases, existing roofs need to be stripped back of the roof covering by about two courses of tiles. This is because the external wall is pointed right up to the top of the rafters where there is an open soffit.
1. Remove the bottom two rows of tiles/slates to allow access to the work area and stack neatly. Then, remove the pointing to the top of the brickwork, which is usually anything from 30mm to 70mm.
2. Once the debris has been removed, fresh pointing needs to be re-applied to the top of the wall to close the gap between the brickwork and ventilator. The new pointing needs to be kept 30mm below the rafters and as before chamfering it to follow the line of the rafters.
3. Position the Glidevale RV Rafter Ventilator on top of the pointing, ensuring the fly screen overhangs the brickwork by 25mm. The ventilator tray should sit between the rafters with the side flaps nailed or stapled to the top of the rafter to keep the ventilator in place. Ensure the insulation is tucked under the tray.
You will now have pointing up to the underside of the ventilator and the roofing underlay lying over the ventilator with a clear airspace through the ventilator.
4. The roof tiles/slates can now be refitted, and the job completed. This will give the required ventilation with an unobtrusive finish.
For more information on ventilation requirements and advice on which ventilator to use, please contact our Technical team on 0161 905 5700 or technical@glidevale.com.
Read our eaves and low level ventilation systems brochure here.


